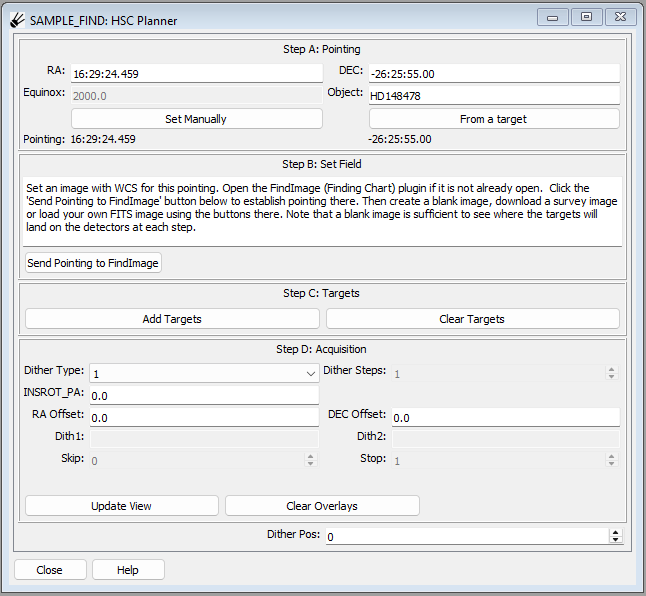
HSC Planner
HSCPlanner works according to the following steps:
establish the pointing of the telescope
create a blank field or DSS field from the established pointing
place one or more targets within the field
set the acquisition parameters and visualize
repeat 4. or from earlier steps as needed or desired
We will go over each of these steps in turn.
Establishing Pointing
The easiest way to establish pointing is to load the Targets plugin with your targets from an OPE or CSV file. Then, select exactly one of the targets and then click the “From a target” button. The RA, DEC, Equinox and Object fields should be filled out.
If you prefer to set it manually, you can type RA and DEC coordinates into the corresponding boxes under the “Pointing” section of the GUI and click “Set manually”. You can use sexagesimal format, with RA in H:M:S and DEC in D:M:S or decimal numbers interpreted as degrees.
Create Field from Pointing
Once pointing is established, we need to create a background field with correct WCS to do the correct overplotting to visualize the acquisition. We will generally do this with the FindImage (Finding Chart) plugin. Make sure that plugin is started, and then click the button “Send pointing to FindImage” to set the defined pointingin that plugin.
In FindImage, create a blank field (by clicking “Create Blank”), or download a survey image of the field (select a survey and click “Find image”). If you’d prefer to use your own locally stored FITS image, you can load it using the “Load FITS” button.
Note
Note that a blank field is perfectly fine for visualizing where your targets will land on the detectors.
Placing Targets within the Field
To place targets within the field, select the desired targets in the Targets table and click “Add Targets”. To clear any existing targets click “Clear Targets”.
Set the Acquisition Parameters and Visualize
Now we are finally ready to set the acquisition parameters and visualize the field throughout the dither. In the section labeled “Acquisition” you can set any of the parameters normally used for HSC acquisition.
The parameters are:
- Dither type:
1 for a single shot, 5 for a 5-point box pattern, and N for an N-point circular pattern
- Dither steps:
Only settable for N-type dither, set it to the number of dither positions
- INSROT_PA:
This parameter will set up the instrument rotator to set the rotation of the field on the CCD plane–see the instrument documentation for details
- RA Offset, DEC Offset:
Offsets in arc seconds from the pointing position in the center of the field
- Dith1, Dith2 (Delta RA, Delta DEC or RDITH, TDITH):
The names of these parameters change according to the dither type selected. For Dither Type 1 they are not used. For Dither Type 5, these parameters specify the offsets in arc seconds for Delta RA and Delta DEC to accomplish the dither between positions. For Dither Type N they specify the offset in arc seconds (RDITH) and the angle offset in degrees (TDITH) for the circular dither. See the instrument documentation for more information.
- Skip:
The number of shots to skip from the beginning of a dither. Leave at the default for the full dither.
- Stop:
Used to terminate a dither early after a certain number of shots. Leave at the default for the full dither.
Once you have set the parameters as desired, press the “Update Image” button to update the overlays. You can then use the “Show Step” control to step through your dither.
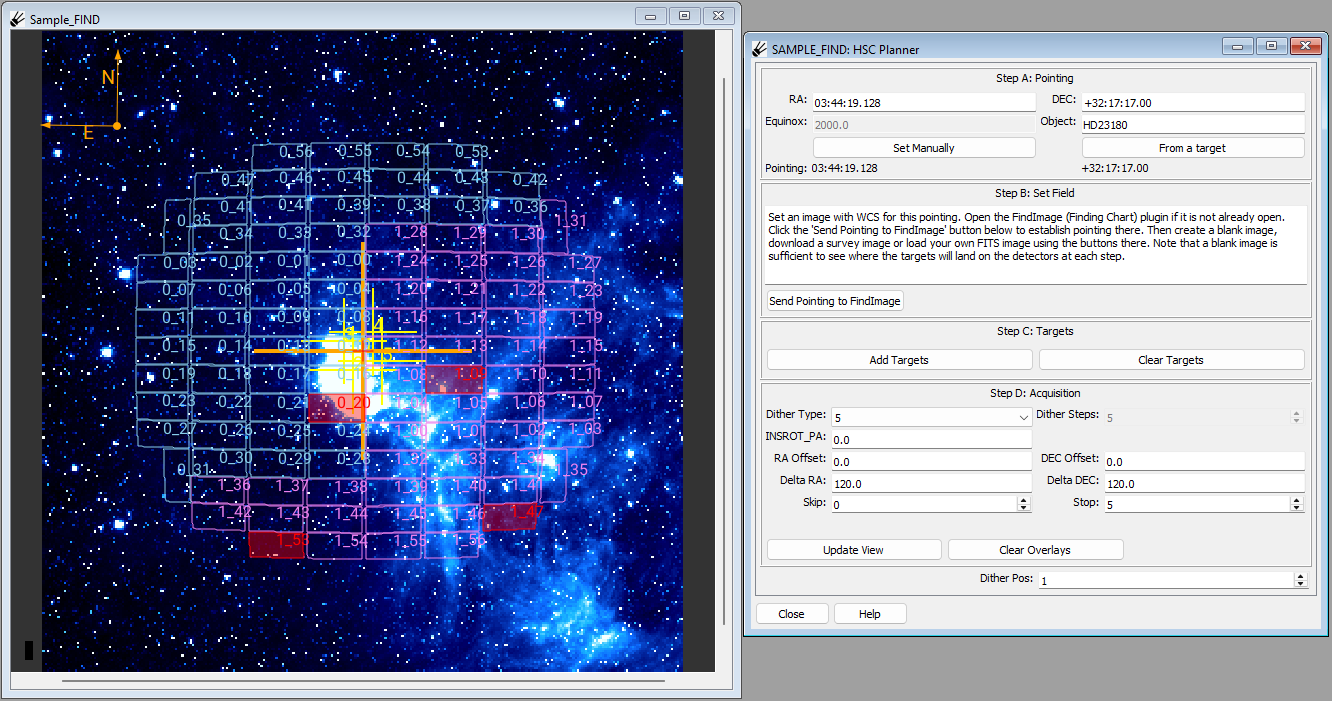
Image contains data from the WISE 3.4 \(\mu\)m survey. (Wright et al (2010), Mainzer et al (2011))
Note
It may be helpful to view the field first with the image zoomed out, and then later to pan to your target (hint: use Shift+click to set pan position) and zoom in to more closely watch the detailed positioning of the target(s) on the detector grid.
Repeat as Desired
You can go back to any step and repeat from there as needed. It may be helpful when repositioning targets to press the “Clear Overlays” button, which will remove the detector and dither position overlays. Pressing “Update Image” will bring them right back.