General Operation and Channels
Startup
To start SPOT, activate your installation environment and then activate SPOT with the command “spot”. When the program starts it will look like this:
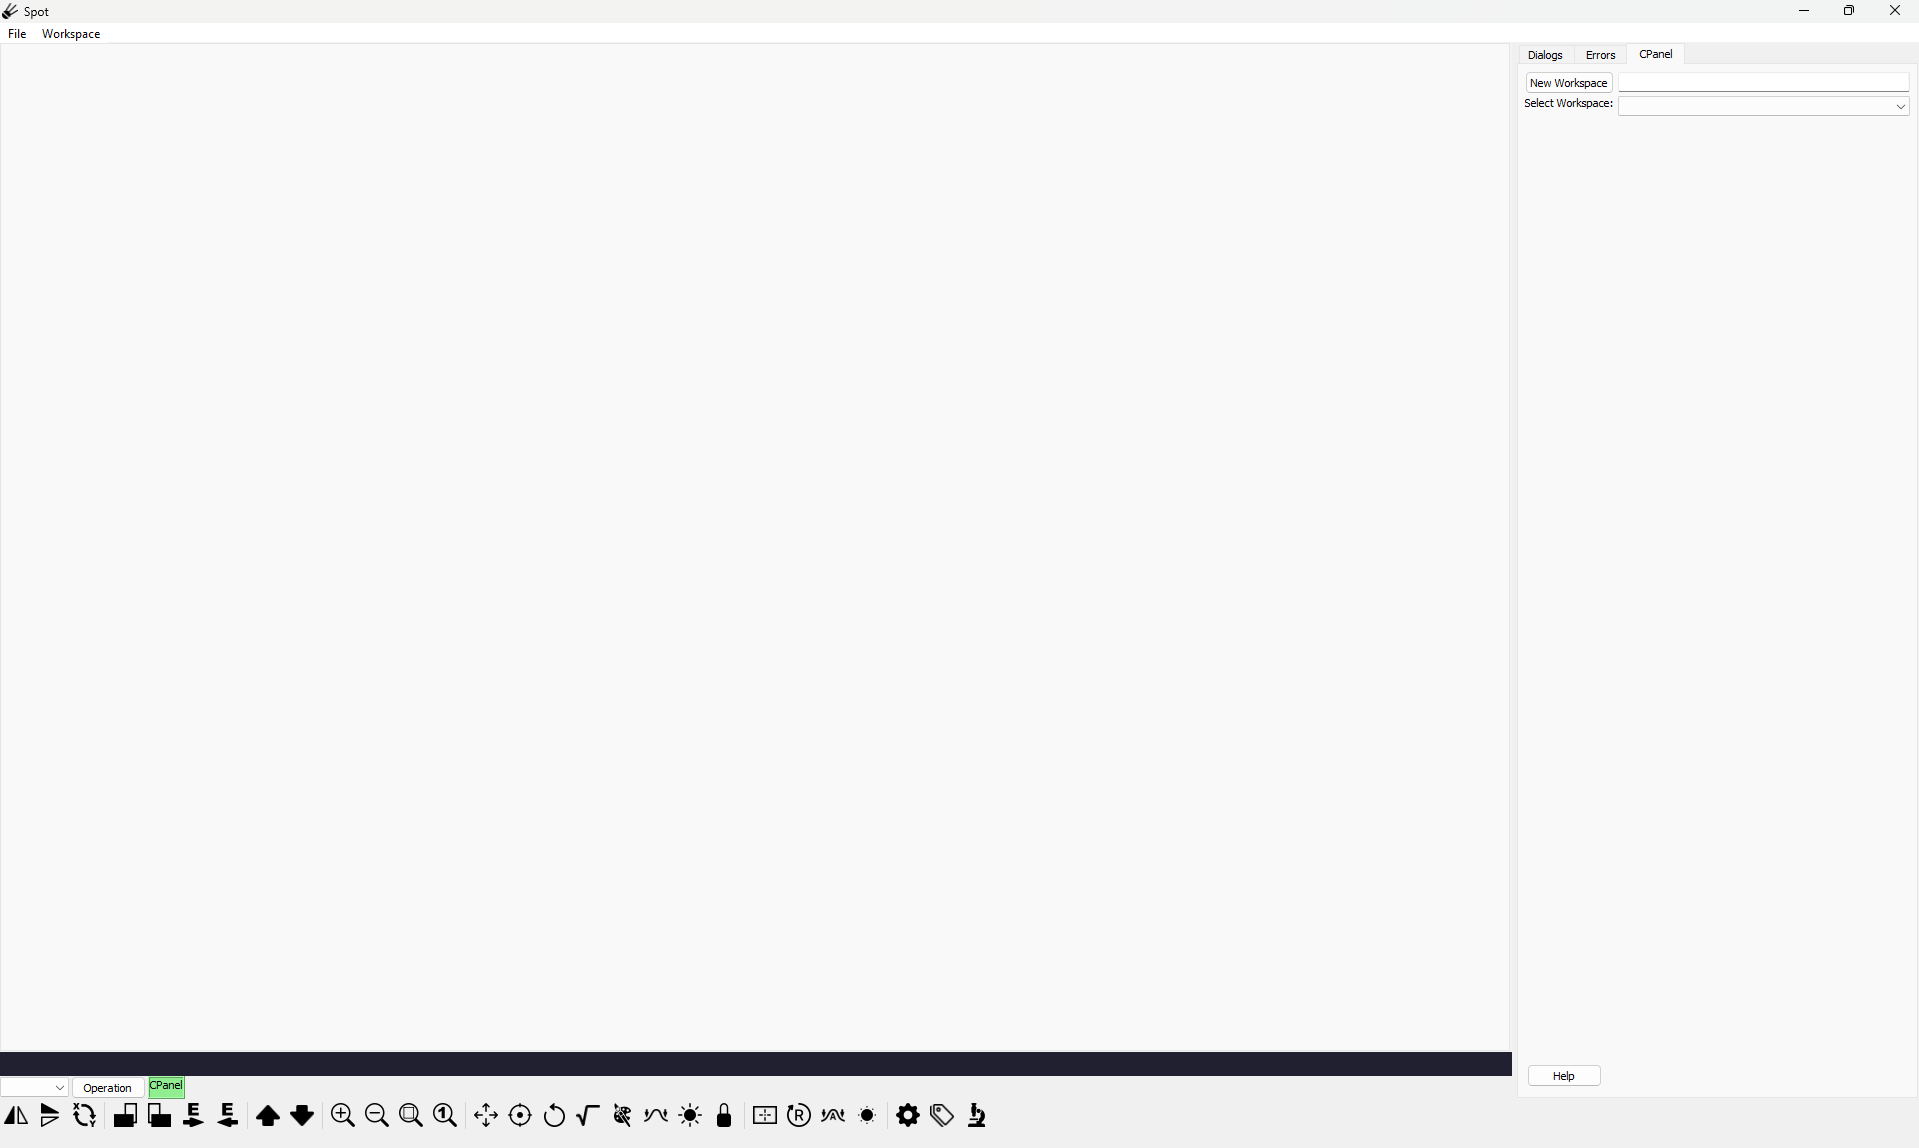
If it has not been selected by default, switch to the CPanel
tab on the right side of the SPOT program. Switching to CPanel
opens the SPOT Control Panel.
On the right side underneath CPanel, you can press Open Workspace
to create a blank workspace. If you would like to give the
workspace a name, you will need to type a name next to the
Open Workspace button in the fillable area. Otherwise,
the name will default to “WS1”, “WS2”, etc.
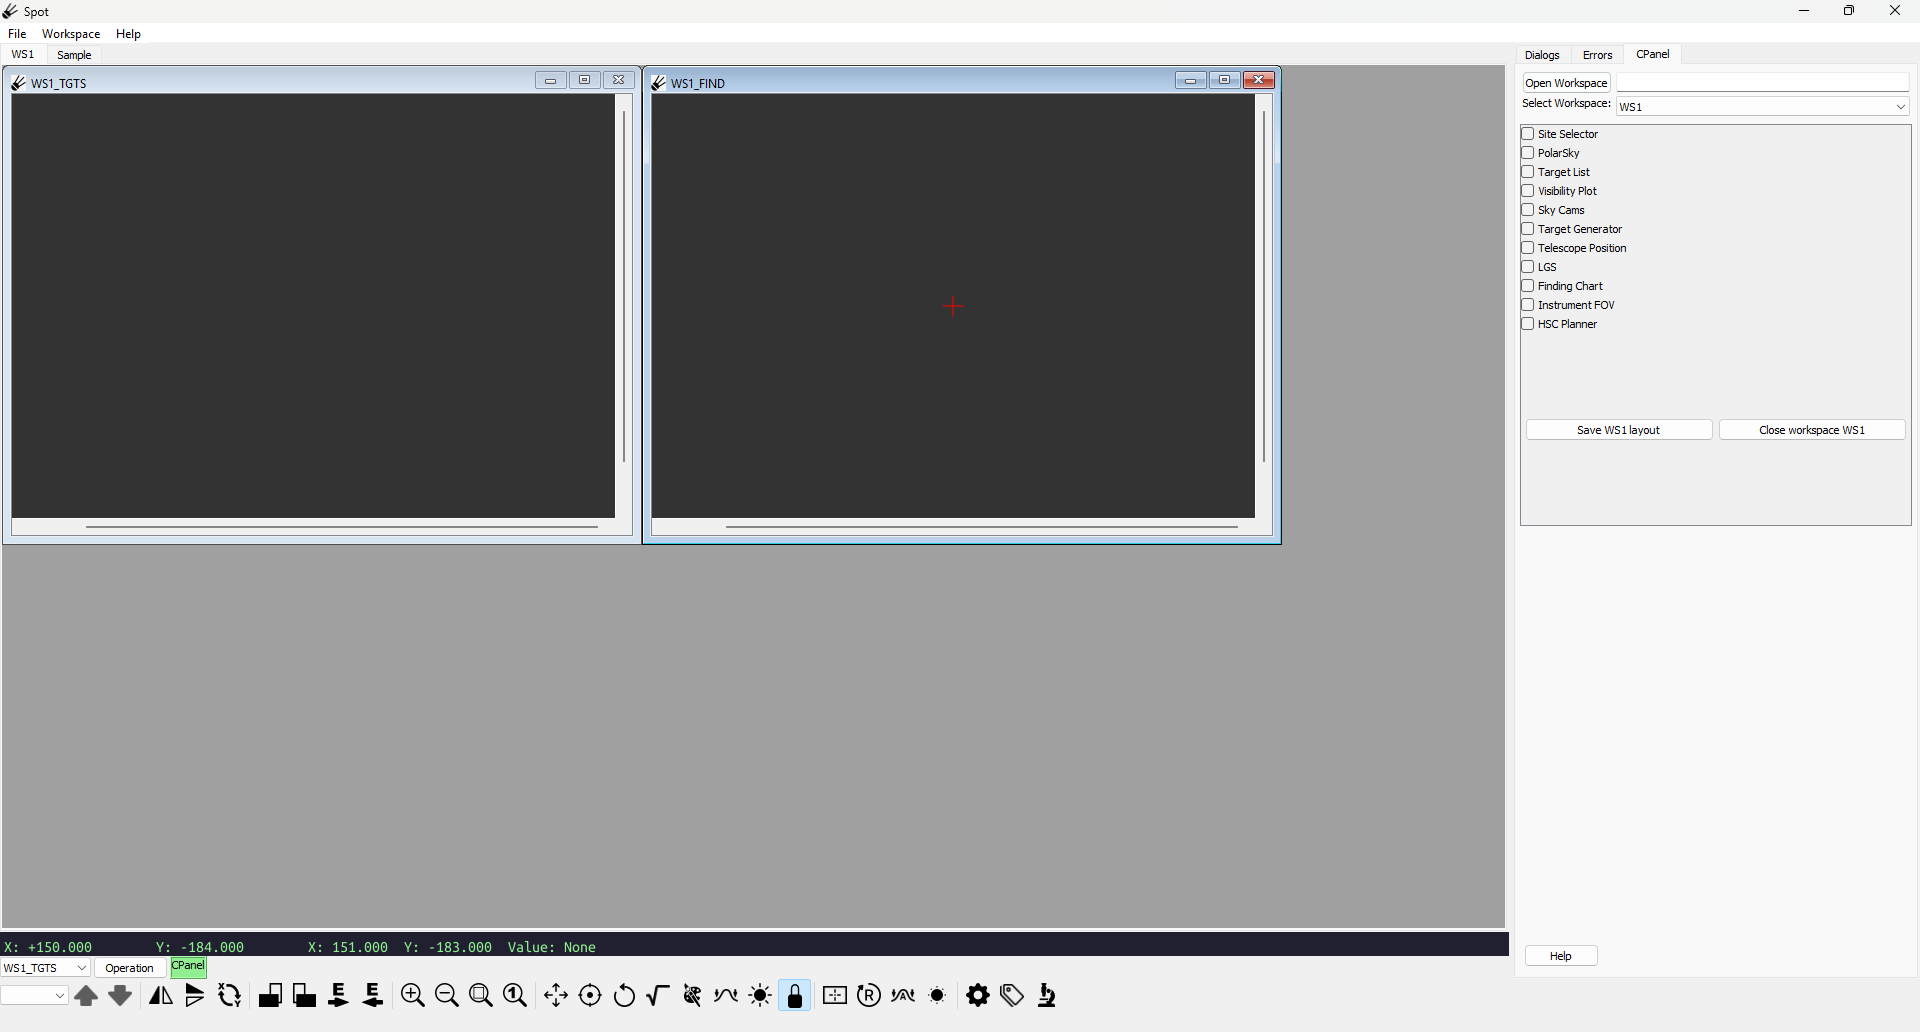
When a workspace is opened two channels will appear, “wsname”_TGTS and “wsname”_FIND. You may want to resize these channel windows. The TGTS channel (Targets Channel) is used to display a map of the sky. Initially it will be blank, so in the CPanel window press Site Selector, Polar Sky, and Target List. In the Site Selector window select a site from the drop down menu, then go to the Targets window and press “File” to browse for a file with your target list. Once you have selected your target file, you will see your targets appear on the TGTS channel (see the link below for the “Target List” plugin for information on the supported file formats for targets).
The FIND channel is used for viewing FITS files. The window will be blank initially, details about the plugins can be found in the following chapters.
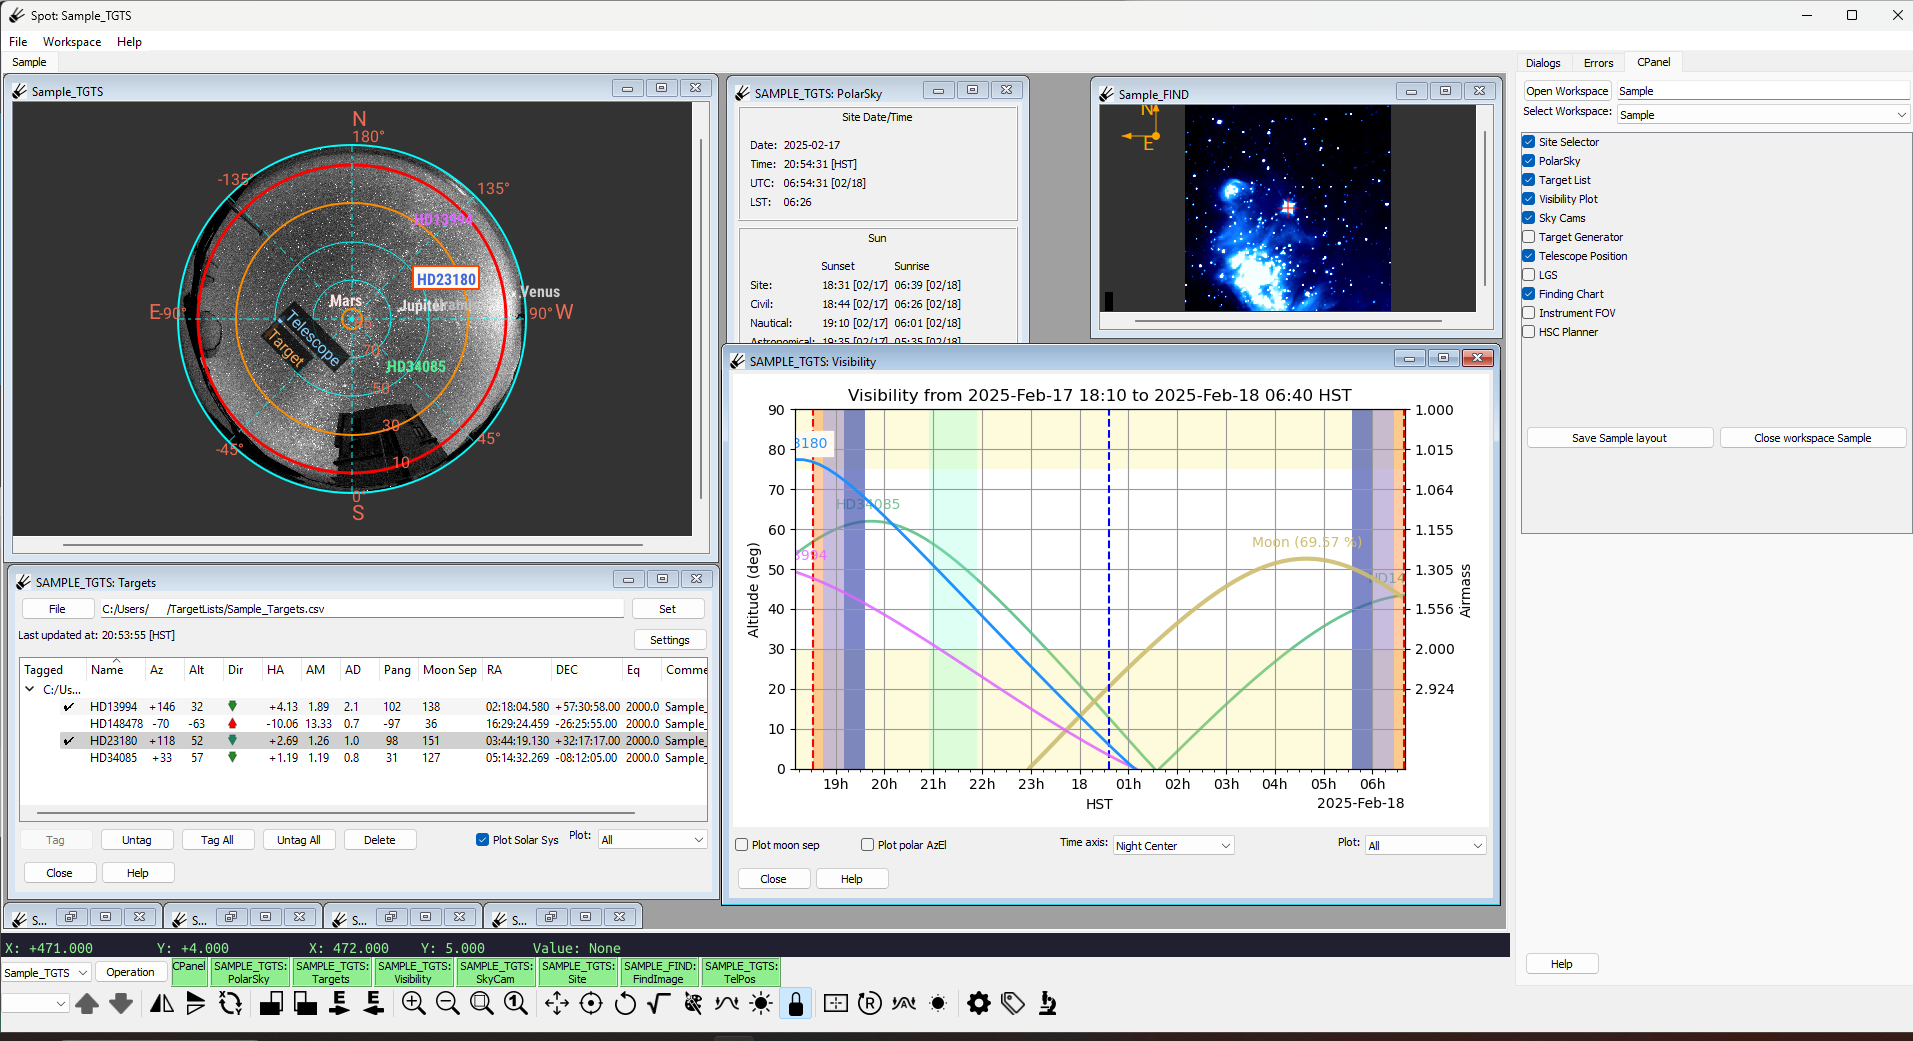
Image contains data from the WISE 3.4 \(\mu\)m survey. (Wright et al (2010), Mainzer et al (2011))
Your layout can be saved using the Save "workspacename" layout
button, which will save the position and size of the channel and
plugin windows.
Whenever you make a new workspace with the same name as
a saved workspace, the saved layout will be loaded.
You can delete a workspace by clicking the Close "workspacename"
button. Note that this will delete everything in the workspace.
TGTS Channel
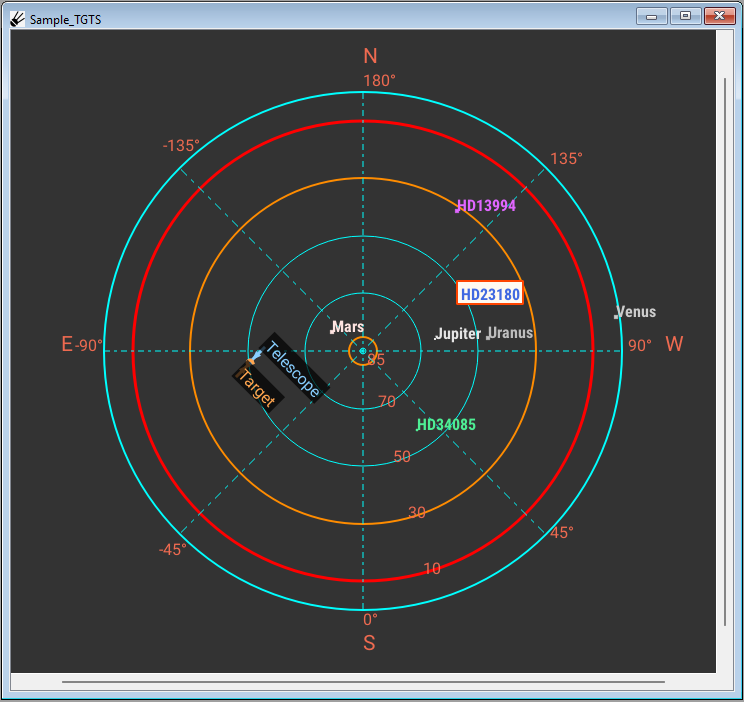
The Targets (TGTS) Channel is the main window for tracking the sky position of selected targets.
FIND Channel

Image contains data from the WISE 3.4 \(\mu\)m survey. (Wright et al (2010), Mainzer et al (2011))
The FIND channel is used to display FITS images and to plan individual or sets of observations.
Loading a FITS image file
The FIND window can be used to display local FITS files. First, open the Operation Menu and select Utils and then select Fbrowser. Search for the FITS file, and then either left-drag and drop into the FIND channel or highlight the file and press “load”. Alternatively, you may use file explorer to find your FITS file and then left-drag the file from the file explorer to the FIND window.
Control Panel
The Control Panel (CPanel) is used to access and display the status of plugins, and also create, switch, and save workspaces.
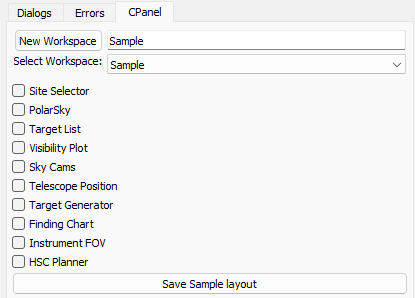
A new workspace can be created by typing a name in the fillable box next to “New Workspace” and then pressing “New Workspace”. If there is a saved layout under the same (case-sensitive) name, the saved layout will be loaded. The name does not have a character limit, but only the first 15 characters are saved and the name of the workspace cannot be changed once it is created. You can swap to another open workspace by opening the drop down menu next to “Select Workspace” and pressing one of the options. Pressing the “Save workspace_name layout” button will save the current size and position of the plugin and channel windows.
Installed plugins are shown in a list, and each can be activated and deactivated by pressing the checkbox next to the plugin name. Information about each plugin can be found in the links below.
Keyboard and Mouse
This portion of the manual has been duplicated from the “Keyboard and mouse operations” section of the Ginga Manual with minor changes.
In this manual we will use the following terms to describe the operations performed with the mouse:
Click or Left-click means to click on an item with the left mouse button;
Drag or Left-drag means to click, hold and drag with the left mouse button;
Scroll means to scroll with the middle mouse wheel or a trackpad/touchpad;
Scroll-click means to click with the middle mouse wheel/button;
Scroll-drag means to click, hold and drag with the middle mouse wheel/button;
Right-click means to click on an item with the right mouse button;
Right-drag means to click, hold and drag with the right mouse button.
Mouse operations are also modified by the keyboard buttons Shift, and Ctrl.
Shift-click means to press and hold the Shift key while clicking with the left mouse button. Shift-right-click is the same using the right mouse button, etc.
Some mouse-controlled operations in SPOT are inititiated by a
key stroke. In these case the key is pressed and released (not held),
and then the mouse is used to control the operation. Such operations
are either terminated by releasing the mouse button (if the operation
employs a drag), and clicking on the image or by pressing the Esc
key (if not a drag operation).
Tool Bar Plugin
At the bottom of the SPOT window there are several icons which can be used to adjust the channels.

(Mouse wheel can frequently be used as a proxy for the mouse scroll)
Image Navigation
 Go to previous image in channel:
If you have opened more than 1 image in the FIND channel, pressing this button will go to the previous image. Otherwise, this option will be greyed out.
 Go to next image in channel:
If you have opened more than 1 image in the FIND channel, pressing this button will go to the next image (images are in a loop). Otherwise, this option will be greyed out.
Image Axes Transformations
 Flip image in X axis:
Flips the image horizontally along the Y axis.
 Flip image in Y axis:
Flips the image vertically along the X axis.
 Swap X and Y axes:
Flips image along the 45 degree diagonal line. (+Y becomes +X and +X becomes +Y)
Image Rotation controls
 Rotate image 90 deg:
Rotates the image 90 degrees counter-clockwise.
 Rotate image -90 deg:
Rotates the image 90 degrees clockwise.
 Orient image N=Up E=Right:
Orients the image so North is up and East is to the right. Activating this setting also activates
Flip image in X axis.
 Orient image N=Up E=Left:
Orients the image so North is up and East is to the left.
Zoom controls
 Zoom in:
Zooms in on the selected channel
 Zoom out:
Zooms out on the selected channel
 Zoom to fit window size:
Zooms the image so that either the X or Y axis matches the size of the channel.
 Zoom to 100% (1:1):
Zooms the image so the image pixel size matchs your computer’s pixel size.
Mouse-Controlled Function Modes
 Pan with left, zoom with right:
While this mode is selected, left-drag with the mouse will pan over the image. Right-drag will zoom in if the mouse is moved to the right, and will zoom out if moving to the left.
 Left/right click zooms in/out; hold middle to pan freely over image:
Left-click will zoom in on the mouse’s location and right-click will zoom out from the mouse’s location. Scroll-drag will pan over the image, where the pan destination is relative to the mouse position on the channel.
 Drag left to rotate; click right to reset to 0 degrees:
While enabled, left-drag will rotate the image around the center point from the clicked location. Right-click will reset the rotation to zero.
 Scroll to set color distribution algorithm:
While this mode is enabled, scrolling will browse through the available color distribution algorithms. The options are “linear”, “log”, “power”, “sqrt”, “squared”, “asinh”, “sinh”, and “histeq”. Default is “linear”.
 Scroll to set color map:
While this mode is enabled, scrolling will browse through the available color maps. The list is extensive and will not be listed here, but can be found in the preferences window, see
Set channel preferencesbelow.
 Left/right sets high cut, up down sets lo cut:
This mode lets you adjust the high and low cuts using your mouse. Left-drag will adjust the cut levels and right-click will reset the cut levels. Dragging the mouse left and right will adjust the high cut, with moving to the right increasing the cut level. Dragging the mouse up and down will adjust the low cut, with moving upwards increasing the cut level.
 Contrast/bias with left/right/up/down:
This mode allows you to adjust the contrast and brightness. Left-drag will adjust the contrast and brightness, right-click will reset both to the default. Dragging the mouse left and right will adjust the brightness, with moving the mouse to the left increasing the brightness. Dragging the mouse up and down will adjust the contrast, with dragging the mouse down increasing the contrast.
 Modes are oneshot or locked:
Allows you to choose if the modes are single use or enabled until disabled by the user. When this option is not highlighted, it is in the “oneshot” mode, where after using a mode once it disables itself immediately after one use. While this option is highlighted, each of the modes is active until disabled by the user. Defaults to “locked” when starting SPOT.
Image Reset Functions
 Center image:
Centers the image on the channel.
 Reset all transformations and rotations:
Resets all transformations and rotations.
 Auto cut levels:
Automatically sets the high and low cut levels.
 Reset contrast:
Resets the image contrast and brightness to the defaults.
Side Panel Functions
 Set channel preferences (in focused channel):
Opens the preferences window for the selected channels. All of the channel settings can be adjusted from this window with more control than if they were accessed using the icons at the bottom bar. See Preferences for more information.
 View image metadata (Header plugin):
Displays the image header under the dialogs tab on the right side of SPOT.
 Magnify detail (Zoom plugin):
Selecting this button creates a
Zoomchannel in the dialogs tab on the right side of SPOT. In the window it shows a zoomed in view of where the cursor is on the TGTS or FIND channels. The zoom amount and refresh rate can be adjusted just below the zoom window. Pressing theRelative Zoombutton will adjust the zoom relative to the zoom level in either the TGTS or FIND window depending on which one you are moving the cursor over.