Target List
Target List, or Targets (Not to be confused with the Targets channel), is normally used in conjunction with the plugins Polar Sky and Visibility Plot to show information about celestial objects that could be observed. It allows you to load one or more files of targets and then plot them on the TGTS Channel, or show their visibility in the Visibility Plot plugin UI.
Loading targets from a CSV file
Targets can be loaded from a CSV file that contains a column header containing the column titles “Name”, “RA”, “DEC”, and “Equinox” (they do not need to be in that order). Other columns may be present but will be ignored. In this format, RA and DEC can be specified as decimal values (in which case they are interpreted as degrees) or sexagesimal notation (HH:MM:SS.SSS for RA, DD:MM:SS.SS for DEC). Equinox can be specified as e.g. J2000 or 2000.0.
Important
The equinox column is in here for future support. Currently, target coordinates in SPOT are assumed to be in ICRS. We hope to eventually be able to support older reference systems such as FK4, but for now please just realize that the coordinates will be assumed to be in ICRS. For J2000 coordinates this will generally be good enough for most planning purposes.
Press the “File” button and navigate to, and select, a CSV file with the above format. Or, type the path of the file in the box next to the “File” button and press “Set” (the latter method can also be used to quickly reload a file that you have edited).
The targets should populate the table and will be grouped by file. To group targets into one group, select “Merge Targets” from the “Settings” drop down menu and then load the files. Once loaded, a target cannot be moved to another group.
Note
SPOT can also read targets from CSV files in “SOSS notation”. See the section below on loading targets from an OPE file.
Loading targets from an OPE file
An OPE file is a special format of file used by Subaru Telescope. Targets in this kind of file are specified in “SOSS notation” (HHMMSS.SSS for RA, +|-DDMMSS.SS for DEC, NNNN.0 for Equinox).
Follow the instructions above for loading targets from a CSV file, but choose an OPE file instead.
Note
In order to load this format you need to have installed the optional “oscript” package: (pip install git+https://github.com/naojsoft/oscript).
Note
Sometimes an OPE file will have unreferenced targets (for example, targets that are defined but not referenced or targets in “PRM” include files that are not referenced. To add those targets to the target list, select “List unreferenced targets” from the “Settings” drop down menu.
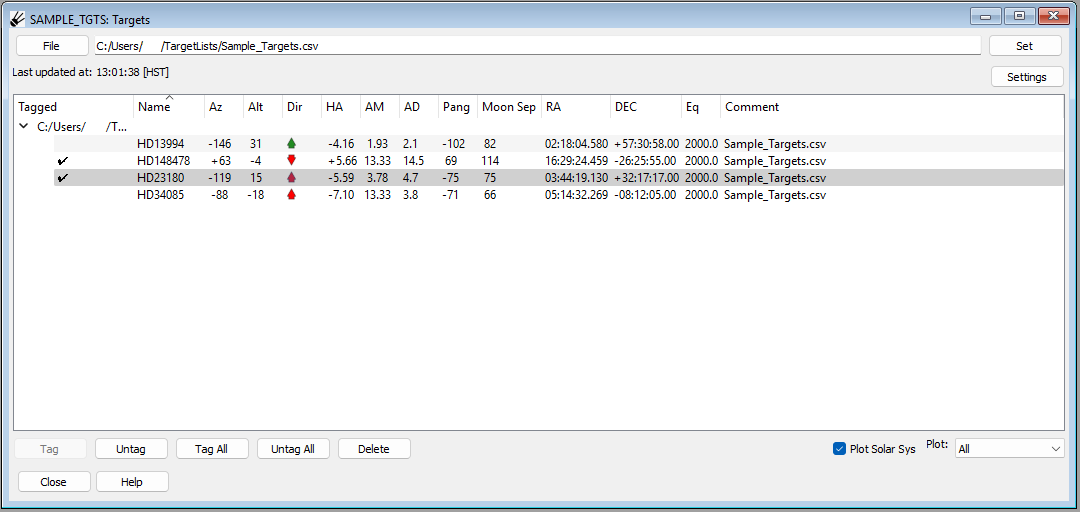
Table information
The target table summarizes information about targets. There are columns for static information like target name, RA, DEC, as well as dynamically updating information for azimuth, altitude, a color-coded rise/set icon, hour angle, airmass, atmospheric dispersion, parallactic angle and moon separation.
Operation
To “tag” a target, select a target on the list by left-clicking on it and press “Tag”. A checkmark will appear on the left side under the “Tagged” column to show which targets have been tagged. To untag a target, select a tagged target on the list and press “Untag”. To tag only the selected target and untag all other targets, select a target from the list and then double left-click on the target row.
On the TGTS Channel and the Visibility Plot, untagged targets will appear in green and tagged targets will appear in magenta. If a target is selected it will appear in blue, and the name will have a white background with a red border on the TGTS Channel.
The “Tag All” button will set all of the targets to “Tagged”, and the “Untag All” button will set all of the targets to “Untagged”. Selecting a target and pressing “Delete” will remove the target from the list. If the target was added from a file, reloading the file by pressing “Set” will restore all of the deleted targets.
Checking the box next to “Plot Solar Sys” will plot the Sun, the Planets, and Pluto on the TGTS Channel.
The drop down menu next to “Plot:” changes which targets are plotted on the TGTS Channel. Selecting “All” will show all of the targets, selecting “Tagged+Selected” will show all of the targets which have been tagged or are selected, and selecting “Selected” will show only the target which is selected.